Lab2: Square Ball
For our lab this week, we are going to practice solving a simple problem using the tools provided in Scratch. We will try to make a figure (not the cat this time) move around the screen in a precise pattern. This time, I want the figure to move in a square pattern, and I want the figure to move in a square pattern only once, then the program is to stop. We will not be using modules for this lab, but we will for the next lab!
Warning
Do not use controls not specified in this lab. We are working on concepts you will see again in C++, not fun stuff Scratch provides.
Picking a New Figure
In Scratch, you can delete the current figure on the screen by right-clicking on it and selecting “Delete”.
You can place a new figure on the screen by clicking on the “Sprites” menu below the white drawing area. Select “Choose new sprite from file”, then double-click on the “Things” folder. Finally, click on the Basketball, then click “OK” to place the image onto the drawing area.
Creating Variables
Scratch lets you set up variables to control things in your program. Let’s create two variables:
Xpos - to control where the ball is in the X direction
Ypos - to control where the ball is in the Y direction
Note
In the standard Scratch screen the center of the drawing area is at X=0, Y=0. X increases to the left, and Y increases up.
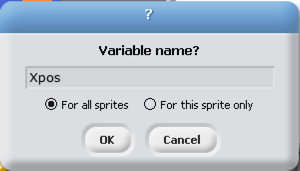
Click on “Variables”, then “Make a variable”. In the window that pops up, give your variable a name, like Xpos.
Create another variable for Ypos the same way.
Setting Varible Values
Once we have variables created, we can give them initial values using another control from the “Variables” menu:
Drag the control labeled “Set [] to ()” to the program area.
Note
I will show square brackets “[]” when the item has a rectangular box in it, and parentheses “()” when there is an oval box in the item.
The square box should be displaying one of your variables. The small arrow at the right of the first box will let you select a different variables.
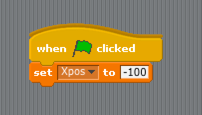
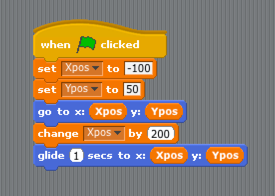
Choose Xpos for the first control. Then click in the second oval box and type in -100. Your code should look like this:
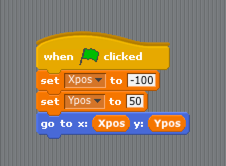
Do this again to give your Ypos variable an initial value of 50.
Placing the Ball
Now that we have two variables set to the coordinates where we want to start the ball, let’s add code to move it to that location.
In the “Motion” menu, select “go to x: () y: ()” and drag it to your code area. Then click on the “Variables” menu and do the following.
Drag the Xpos variable name to your code area and drop it onto the oval box after “x:”. The variable name should replace the “0” originally displayed there. Do the same for Ypos in the second oval box. You code should look like this when done.
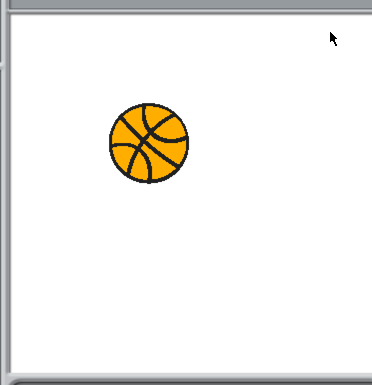
Test your code by clicking on the flag and make sure the ball hops to the right spot. It should look something like this:
Warning
Depending on how big your computer screen is, and how big the Scratch window is, your image might look different. You may need to play with the values we are using so it stays on your screen properly!
Moving the ball
To move the ball to the right side of the screen, we need to modify our variables. If we want to move the ball straight across the screen in the X direction, we just need to add something to the value stored in Xpos, say 200.
Drag the item labeled “change {} by ()” to your code. Select Xpos in the first box, and change the second one to 200.
Now, select the “Motion” menu” and select “Glide () secs to x: () y: ()”. Once again, drag your variables into those oval boxes. This is what your code should look like now:
Click on the flag icon and make sure your ball moves smoothly across the screen. You should be able to repeat this as many times as you like.
Completing a Box
Now, it is your turn. The ball is at the top right side of the screen. We want to next move it down to about a Ypos value of -50. Then we want to move it straight left across the screen to an XPos position or -100. Finally, we want to move the ball back to the starting point.
Add code (basically repeating the code you see here) to complete that action. Run your final code and make sure it does move in a complete box.
Note
Scratch lets you copy a set of code blocks by right-clicking on the top item, then selecting “Duplicate” it will make a copy of every item in the set from the point of your click to the bottom. Drag that into place and let go of the mouse button to add the new code. See the reference manual for more details,
The Sequence Structure
Your code at this point is a simple sequence structure. You are asking the computer to process one instruction after another, reading your code from top to bottom. As you can see, we have duplication here, but that is OK for now. We will clean things up in a later lab.
Using a Loop Structure
Suppose we want to cause the ball to spin around in the box pattern exactly 5 times. We could copy all the code to get this done, but that is a waste of our time! Let’s use a loop!
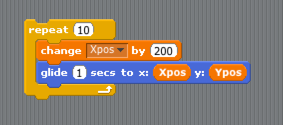
In the “Control” menu, there is an item labeled “Repeat (). You can set a number in the oval box to control how many times you will be looping. Drag one of these control to your code area, but do not attach it to your code yet.
We need to move this loop into our code after the initial “go to” block, and put all the code after that “Inside” the loop.
Click the mouse on the block at the top of the sequence of blocks you want to move. Drag the mouse down a bit, and the entire block should disconnect from your program. Slide the block down until you see the bold white line in the middle of the “horseshoe” below the “repeat” phrase. When you let go of the button, the block of code should now be “nested” inside the loop control! Neat.
Here is what it looked like when I dragged the two controls we added to slide the ball to the left to the loop control:
Think about what would happen if I hooked this loop up to the bottom of my code and ran it! What would the ball do?
Warning
Your ball might slide off the screen in this case. Actually, it should stop, showing just a bit of the ball that you can grab with your mouse and place back on the screen.
Your Turn
Make your ball spin around that box exactly four times.
The Decision Structure
So far, we have not asked any questions in our project. Although we have a nice program that works the way we want, let’s add another variable to control how many times we want the ball to spin around the box. I am going to call this variable NumBoxes. I also need another variable named count to track how many times I have been around so far.
Add code at the top of your program to set count to 0, and NumBoxes to 3.
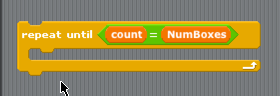
Now change your “repeat” loop control to one that says “Repeat until <>”. Those “<>” brackets are a box where we will ask our question!
In the “Operators” box, find a block that looks something like this: “< () = ()>” and drag it into the question spot in your loop control.
Next, drag your count variable into the first box in the question, and NumBoxes into the second spot.
You should see something like this:
We will call this a “conditional loop”, or a “DO-UNTIL” loop. We will keep on looping until the value in count is equal to the value we set in NumBoxes.
If we run the program now, what will happen?
Note
Now is the time to note that you can click on the red stop sign at the top right of your screen to stop a program. You might need that!
Completing this step
Obviously, we need to change the value stored in count inside the loop if we ever hope to make this program halt. There is a control in the “Variables” menu labeled “Change [] by ()”. Make this control change count by “1” when it gets processed and slide it into your loop just before the bottom.
Now run your code and make sure it spins around exactly three times.