Building Modules in Scratch
Read time: 29 minutes (7289 words)
Although Scratch is not ideal for exploring modules, we can build some simple ones, and see what this module stuff is all about.
Simple Drawing Commands
Scratch has an entire menu devoted to creating drawings by moving a “sprite” (that Cat is a “sprite”) around while dragging a “pen”. The concept is pretty simple. There is a “set pen size to ()” control to set the thickness of the line we will draw. A “pen down” to place the pen on the screen, and a “pen up” command to move the pen off of the screen. By combining these controls in a program that includes movement commands we can create simple drawings! Cool.
Draw a Square
Here is a script that will draw a simple square on the screen using these controls. Note that I changed the sprite to a Pencil so it looked more natural than having that cat move around leaving a trail!
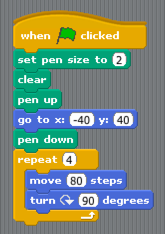
Make sure you see the reason each control is here. In fact, pull out parts of the program and run it to see what each control does!
Here is the result of running this code:
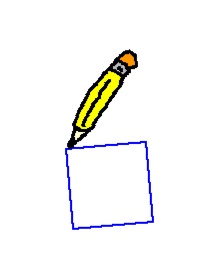
Do you see a problem here? Why is that silly square tilted? The reason is that I used the “move () steps” control, without worrying about what direction the pen was pointing. (What?) Scratch uses the “current direction” to decide which way to move. We can change this control and make something more reasonable happen.
Try this:
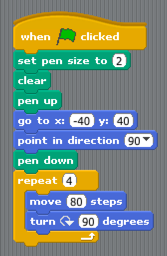
Here I used a control to point the pen in the right direction (still sounds silly, but it works!)
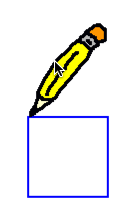
Now, it is lined up right
Creating a Module
We can disconnect all the controls that actually draw the square from our main program code, and make Scratch activate them on demand. That is exactly what a module is all about. We give the module code a name, and activate it when we need that code to run.
Call/Return
In conventional programming, modules have a name, and we “call” that name to activate the code in the module. When we reach the end of the code in the module, we “return” to the place where we were when we “called” the module, and continue on in the original code right below that calling point. How this magic happens is not important here, but it works!
In fact, one module can “call” another one, and things will work out as you expect. The second module will “return” to the first module, and the first module will “return to the main program code.
We will see all this in action when we explore C++ later in the course!
Scratch Broadcast/Receive
Scratch uses a control labeled “broadcast []” where you place the name of the module in the box, and a matching “when I receive []” control that reacts to this “broadcast” control.
Your main chunk of code is actually a module of a sort, but you “call” it into life when you start your program. That code has the program start control (that block with the green flag), and you click on that to make your program run.
When you place the “broadcast []” control in your main code, you click in the small box on that control and select “new”. You enter the name you want your module to have. I entered “square” in my control here:
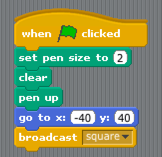
Nothing will happen if I try to run this code now, we do not have a module yet!
Now create this square module, and keep it detached from the main code. Modules are separate things, after all!
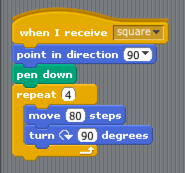
Now, run your program by clicking on the green flag, you should see your square.
Congratulations, your first module works! (If not, check your program module blocks, both of them!)
Controlling the Square
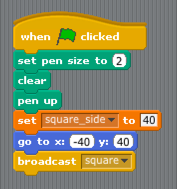
The only problem we have with this module, is all it does is draw one silly square. I want all kinds of squares all over the place! We need to put one more control in the module, that will be a variable that controls how big the square should be.
Add a variable named “side_length” to your main cide, and set it to 80. Then modify your module so it looks like this:
And here is the module code block:
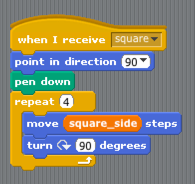
This is pretty cool. Now we can control the size of the square. As set up here, the square is going to be centered on the screen, which is what I wanted.
Drawing Multiple Squares
Now that we have a module that can draw a square, let’s try drawing two of them. The first attempt to do this probably will fail, and the reason why is not obvious at all!
Scratch Broadcast Trickery
Scratch is actually doing something very tricky in that “broadcast” control. It sends a message to a module code block, and that module can do it’s thing simultaneously with other modules (and the main code) that may be running. This is a form of “parallel processing”, and it makes things not work they way we want. So, we need to change the control to a different one: “broadcast [] and wait”.
This control will make your calling code stop while the module runs, then continue on when it finishes. That is the way normal programs run. I will admit I did a lot of this “parallel processing” work when I ran a supercomputer center for the Air Force, but that is not what we are trying to learn here.
Here is the modified code we need:
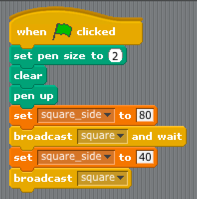
Notice that I am not using the move control here, I want all of my squares to be centered on the screen, so I am going to let the module figure out where it needs to be place by itself! If you want to place squares at other places, you could use more variables to control that, and set them before you activate the module!
Here is the code needed to center the square.

Study this code and make sure you see why I am doing those calculations. The center of the square is supposed to be at X=0, y=0. (If you have trouble with “coordinates” let me know.) Where is the top left corner supposed to be? We need to calculate that so we can place the square in the right place. Scratch has no clue what it is drawing, so it is up to us to start drawing at the right place, so the middle of the square is in where we want it to be! Welcome to programming: solving lots of tiny problems as you work through a bigger one. Hey, that is “decomposition” at work!
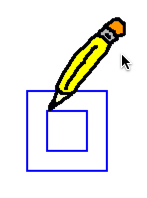
Here is the final result. It seems to work properly!
Drawing a Triangle
For this program, I am again going to center the triangle at X=0, but I am going to allow the main code to define the Y value for the base of the triangle. This triangle will be an isosceles triangle with the base at the bottom.
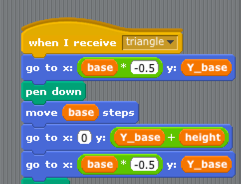
We need two variables for the size of the triangle: “base” and “height”. We will also set up another variable for “Y_base:
Here is the module:
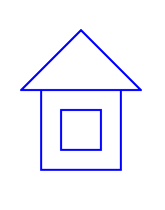
My idea here is to draw a house, which is going to be just my nested squares with a triangle roof. Here is the modified main code that will do this:
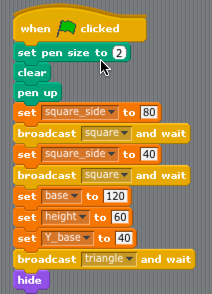
By the way, see that last “hide” control? That one makes your sprite (the pencil” disappear so you can see your art work!
And here is the final house. Simple but fun!
Module Parameters
Those variables we are using to control the module are not exactly like those we see in real programming languages. Instead those are something called “global variables”. What that means is that any code in the total program: the main code and any modules you define, can all see and use those variables. That is fine for our experimenting, but not what we want for real programs. It would be nice to let modules have their own private variables, ones we call “local variables” so no other module can modify them by accident. We will see that kind of control when we explore C++.
For now, that is enough to set you up for this weeks Lab project. This will be our last Scratch Project for now, we need to move to C++, so we will be doing that next week. Plan ahead, if you need help, I am available during my office hours, and on most Saturdays at the SAC campus to help!