C++ Graphics
Once you completed the graphics setup instructions, you now have two graphics libraries on your system: OpenGL and Glut. Both of these have a huge number of folks working to build some pretty cool graphics applications. We are not ready to do that, but we can tap into their work and do some fun stuff. The problem is that even with the new addition we installed, all of this is still too complicated.
Adding the class files
I have created a simple pair of files we can add to our projects to build simple graphics applications. Most significant programs involve more than one file, so this is not at all unusual.
The two files we will need are:
Graphics.cpp- new graphics functions we can use
Graphics.h- Needed to tie your program to the graphics routines
We will add the first file to our program project, then include the second
file in our graphics programs. CLion will take care of hooking everything
together.
Don’t panic
If this scares you, don’t panic! Many other students have managed to get this working. Most of them enjoyed the projects we did in this part of the class.
Setting up a demo
To get all this working do this:
Open up CLion
Choose
File --> New Project
Change the “Location” to build a
GraphicsDemofolderClick on the
Createbutton at the lower right
Now, we need to check things:
Edit the
main.cppfile for it says “Graphics Demo” instead of “Hello World”Run this code to make sure everything is set up correctly
Save your project as usual
This program needs a bit more setup than our earlier work. You will be adding two more files to your project. If you are getting overwhelmed by all this, please be patient. I will give you plenty of time and help to get things going. Just follow the notes and know that many classes before you have gotten through this, and had fun with the result!
Hello, Graphics World
Modify your main.cpp file so it looks like this:
#ifdef __APPLE__
#include <GLUT/glut.h>
#else
#include <GL/glut.h>
#endif

#include "Graphics.h"

void drawScene(void) {
    // your code goes here
}

int main(int argc, char ** argv) {
     graphicsSetup(argc, argv);
     glutDisplayFunc(drawScene);
     glutMainLoop();
}
That stuff looks pretty scary! The first few lines will make this program work on either a Mac of a Windows PC. (That sure looks like a strange IF-THEN-ELSE, and it is, but those lines are aimed at the compiler!) You probably are using a PC, but others, including me, are using Mac systems. This is a common issue in programming since the two systems set things up differently.
Make sure you type everything you see exactly as shown. The names and function
calls you see for things like glutDisplayFunc are parts of the Glut
library, and they set up the program to draw the things we see in our
drawScene procedure. It may seem strange to put the name of one procedure
into the call to another procedure as a parameter, but it is legal, and is
required by glut to make it draw images on the screen. For now, just
consider it magic!
Wait, we are not done
The code just shown is incomplete. See the “your code goes here” line? We will put our own code here. Make sure you do not mess anything else up! We also need to add out additional files.
Adding the Graphics files
Copy the needed files from the folder you set up when you worked through the CLion Graphics Setup notes.
Graphics.cpp
Graphics.h
CMakeLists,txt
Once this is finished, you should have three files in your project
Graphics Procedures
Now, we can now draw simple shapes
Boxes
Circles
Triangles
We can also control the colors used
Graphics window
All drawing is done in a 500x500 pixel window. A pixel is one dot on your
screen. There is a coordinate system associated with this window.
Xruns from 0 to 500 from left to right.
Yruns from 0 to 500 from bottom to top(The
originis in the lower left corner)
The simple graphics procedures I have provided give you the ability to draw a few simple objects on the screen and control where they are and what size and color they are. The code creates a square window on your screen 500 pixels wide and 500 pixels high. (A pixel is one dot on your screen, which is probably running with 1024 pixels horizontally, and 768 vertically (or more if you have a newer system). In the procedures I have created, the origin of the system is at the lower left corner of the window. x coordinates go from 0 at the left to 500 at the right, and y goes from 0 at the bottom, to 500 at the top. You will need to figure out what coordinates (x,y) you need to work with when you use the simplified graphics procedures. Here are the routines you can use for starters:
Drawing boxes
To get started, here are a couple of new functions:
drawBox(x1,y1,x2,y2)
drawFilledBox(x1,y1,x2,y2)
Here x1,y1 and x2,y2 define the box. These points are the opposite
corners of the box. These functions do not return a value. You call them
by putting them on a line by themselves. Make sure you end the line with a
semicolon!
Remember that when you use these functions in your program, they are a
statement all by themselves and will need a semicolon after them like all
statements in C++ do.
How about a circle
This function draws a circle;
drawCircle(x,y,radius)
Here x,y is the coordinate of the center of the circle. radius is (well, you know!)
Ready for triangles?
These functions draw triangles:
drawTriangle(x1,y1,x2,y2,x3,y3)
drawFilledTriangle(x1,y1,x2,y2,x3,y3)
Here, x1,y1, x2,y2, and x3,y3 set the three corners.
Simple lines
We can draw a straight line using this function:
drawLine(x1,y1,x2,y2)
The line goes from x1,y1 to x2,y2.
Setting colors
Each graphic object is drawn with a colored pen. You select the color for the pen using this function:
setColor(color)
- where
colorcan be one of these names:
WHITE, BLACK, RED, BLUE, GREEN, GREY, PURPLE, FOREST_GREEN
MIDNIGHT_BLUE, CYAN, MAGENTA, YELLOW, BROWN
(case is important here)
You must type in the name in all caps, exactly as shown above. Lower case names, or misspellings will cause errors when you try to compile your code.
A simple demo
Here is the code we need to add to test our routines
void drawScene(void) {
     clearWindow();
     setColor(YELLOW);
     drawFilledTriangle(200,125,100,375,200,375);
     glEnd();
     glutSwapBuffers();
}
Let’s add a few more objects to our drawing Add these lines (inside the
drawScene function:
setColor(BLACK);
drawLine(200,200,400,400);
setColor(RED);
drawFilledCircle(100,100,100);
setColor(MAGENTA);
drawFilledBox(300,300,400,400);
Final demo output
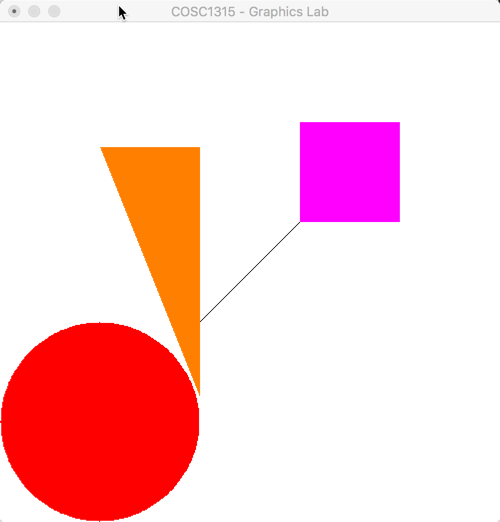
If you have any problems getting this running, send me an email and I will help you through your problems. Once things are working, try the next lab assignment. It is not too hard!
The Graphics Files
Just to make sure you have the current versions of these files (there are several older ones around), here are the files I am using for this class. You do not need to understand what is in these files. They are provided so you can check the files you download, if you run into problems:
- Graphics.h
1 2 3 4 5 6 7 8 9 10 11 12 13 14 15 16 17 18 19 20 21 22 23 24 25 26 27 28 29 30 31 32 33 34 35 36 37 38 39 40 41 42 43 44 45 | #ifndef GRAPHICS_H
#define GRAPHICS_H
// set the drawing screen dimensions and position
#define WINDOW_HEIGHT 500
#define WINDOW_WIDTH 500
#define WINDOW_X 100
#define WINDOW_Y 150
// set the pre-defined colors
#define WHITE 1.0,1.0,1.0
#define BLACK 0.0,0.0,0.0
#define RED 1.0,0.0,0.0
#define BLUE 0.0,0.0,1.0
#define GREEN 0.0,1.0,0.0
#define GREY 1.0,0.5,0.0
#define PURPLE 0.5,0.25,0.0
#define FOREST_GREEN 0.0,0.25,0.0
#define MIDNIGHT_BLUE 0.0,0.0,0.25
#define CYAN 0.0,1.0,1.0
#define MAGENTA 1.0,0.0,1.0
#define YELLOW 1.0,0.5,0.0
#define BROWN 0.5,0.25,0.0
// initialization routine
void graphicsSetup(int argc, char **argv);
void drawScene(void);
void clearWindow(void);
// set line or fill color
void setColor(double red, double green, double blue);
// graphic object primatives
void drawTriangle(int x1, int y1,int x2,int y2,int x3,int y3);
void drawLine(int x1, int y1, int x2, int y2);
void drawBox(int x1, int y1, int x2, int y2);
void drawCircle(int x1, int y1, int radius);
// filled graphics primatives
void drawFilledTriangle(int x1, int y1,int x2,int y2,int x3,int y3);
void drawFilledBox(int x1, int y1, int x2, int y2);
void drawFilledCircle(int x1, int y1, int radius);
#endif
|
- Graphics.cpp
1 2 3 4 5 6 7 8 9 10 11 12 13 14 15 16 17 18 19 20 21 22 23 24 25 26 27 28 29 30 31 32 33 34 35 36 37 38 39 40 41 42 43 44 45 46 47 48 49 50 51 52 53 54 55 56 57 58 59 60 61 62 63 64 65 66 67 68 69 70 71 72 73 74 75 76 77 78 79 80 81 82 83 84 85 86 87 88 89 90 91 92 93 94 95 96 97 98 99 100 101 102 103 104 105 106 107 108 109 110 111 112 113 114 115 116 117 118 119 120 121 122 | #ifdef __APPLE__
#include <GLUT/glut.h>
#include <iostream>
#else
#include <GL/glut.h>
#endif
#include "Graphics.h"
#include <cmath>
double PI = acos(-1.0);
double ANGLE_STEP = PI/180.0;
void setColor(double red, double green, double blue) {
glColor3d(red, green, blue);
}
void quitKey(unsigned char key, int x, int y) {
#ifdef __APPLE__
if (key == 'q') std::exit(0);
#else
if (key == 'q') exit(0);
#endif
}
void graphicsSetup(int argc, char **argv) {
glutInit(&argc, argv);
glutInitDisplayMode(GLUT_DEPTH | GLUT_DOUBLE | GLUT_RGBA);
glutInitWindowPosition(WINDOW_X,WINDOW_Y);
glutInitWindowSize(WINDOW_HEIGHT,WINDOW_WIDTH);
glutCreateWindow("COSC1315 - Graphics Lab");
glClearColor(WHITE,0.0);
gluOrtho2D(0,WINDOW_WIDTH, 0,WINDOW_HEIGHT);
glutKeyboardFunc(quitKey);
}
void clearWindow() {
glClear(GL_COLOR_BUFFER_BIT);
}
void drawTriangle(int x1, int y1, int x2, int y2, int x3, int y3) {
glBegin(GL_LINE_STRIP);
glVertex2i(x1,y1);
glVertex2i(x2,y2);
glVertex2i(x3,y3);
glVertex2i(x1,y1);
glEnd();
glFlush();
}
void drawFilledTriangle(int x1, int y1, int x2, int y2, int x3, int y3) {
glBegin(GL_POLYGON);
glVertex2i(x1,y1);
glVertex2i(x2,y2);
glVertex2i(x3,y3);
glVertex2i(x1,y1);
glEnd();
glFlush();
}
void drawLine(int x1, int y1, int x2, int y2) {
glBegin(GL_LINE_STRIP);
glVertex2i(x1,y1);
glVertex2i(x2,y2);
glEnd();
glFlush();
}
void drawBox(int x1, int y1, int x2, int y2) {
glBegin(GL_LINE_STRIP);
glVertex2i(x1,y1);
glVertex2i(x2,y1);
glVertex2i(x2,y2);
glVertex2i(x1,y2);
glVertex2i(x1,y1);
glEnd();
glFlush();
}
void drawFilledBox(int x1, int y1, int x2, int y2) {
glBegin(GL_POLYGON);
glVertex2i(x1,y1);
glVertex2i(x2,y1);
glVertex2i(x2,y2);
glVertex2i(x1,y2);
glVertex2i(x1,y1);
glEnd();
glFlush();
}
void drawCircle(int x1, int y1, int radius) {
double angle;
int X, Y;
glBegin(GL_LINE_STRIP);
for (angle=0;angle< 2.0*PI + ANGLE_STEP; angle += ANGLE_STEP) {
X = x1 + int(double(radius) * cos(angle));
Y = y1 + int(double(radius) * sin(angle));
glVertex2i(X,Y);
}
glEnd();
glFlush();
}
void drawFilledCircle(int x1, int y1, int radius) {
double angle;
int X0, Y0, X1, Y1;
glBegin(GL_TRIANGLES);
X1 = x1 + radius;
Y1 = y1;
for (angle=0;angle< 2.0*PI + ANGLE_STEP; angle += ANGLE_STEP) {
X0 = X1;
Y0 = Y1;
X1 = x1 + int(double(radius) * cos(angle));
Y1 = y1 + int(double(radius) * sin(angle));
glVertex2i(x1,y1);
glVertex2i(X0,Y0);
glVertex2i(X1,Y1);
}
glEnd();
glFlush();
}
|