Looping
Read time: 25 minutes (6257 words)
See also
Text: Chapter 5
The classic loop is a foundation structure in programming. Drawn as a “flow chart” it looks like this:
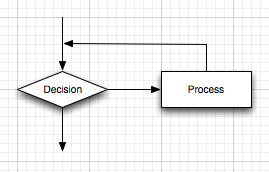
With this one form of loop, you can solve any looping problem you face. However, it is convenient to have alternatives available, and most languages give you those.
This loop asks a question that decides whether to do a task or not. If we do the task, we go back and ask the question again. The minimum number of times we do the task is zero in this form of loop.
The other forms of loop statements, added to our arsenal of programming tools just to make our lives as programmers easier. They are not really essential. In the material that follows, I will show you syntax diagrams for the most common forms of C++ loop statements you will be using in this class. You should study these and see if they map into Python, or other languages you might have seen before.
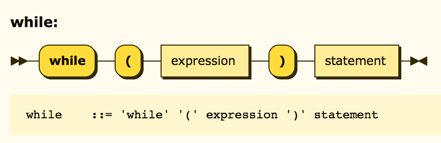
While Statement
This is the standard “while loop” which implements the diagram we saw earlier:
The most common use for a “while loop” is one where we read input from the user, stopping when they enter a “sentinel” value that says they are done. For example, in entering a list of positive numbers, we might use a negative number as a sentinel:
std::cout << "enter positive numbers, (negative when done)" << std::endl;
std::cin >> variable;
while(variable > 0) {
    // do something
    std::cin >> variable;
}
This will stop when the user enters a negative number. (Actually, it will stop on zero as well. Is that what oyu wanted?)
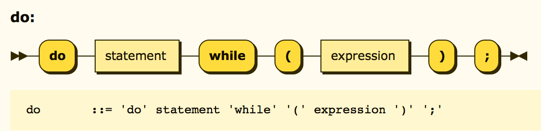
Do-While Statement
This one is not in Python! In this form we ask the question after we process the loop. That means the loop statement will be evaluated at least once, and if the question evaluates to false, we exit the loop. (I admit I seldom use this one, I have trained myself to work out solutions with the “while loop” form.)
For Statement
There are many situations where you know exactly how many times you want to process something. This happens when we work on arrays of data, fo instance. In this case, we want a counter to track each pass, and will probably use that counter in indexing our arrays.

There are three sections to the declaration of the “for loop” control, separated by semicolons, and surrounded by parentheses:
initialization - used to set up a counter with an initial value
Loop condition - used to decide if we process the loop body
post increment - used to update the counter after the loop body processing finishes.
The biggest new thing you need to remember about this loop is that you can invent a counter variable in the statement itself. Here is an example:
for(int i=0;i<10;i++){
    // do something
}
The “gotcha” in using this setup is that the variable “i”, declared as we set the loop up, disappears after the last brace surrounding the loop body. Attempting to use that value will not work, since the variable is not around any more!. If you want it to be around, you need to declare it before the loop starts, and leave off the “int” in front of the counter name.
This will not work:
for(int i=0; i<10; i++) {
    if(i == 5) break;
}
std::cout << "i" << " should be 5 now" << std::endl;
That last statement will fail unless you declared “i” somewhere else. Even then, the value will not be 5, except by accident. The variable “i” inside the loop is a new variable, which hides any other variable of the same name that might exist outside the loop.
This entire issue is called “scoping Rules”, and we will go over them after we talk about functions in our next lecture.
How the “for” Loop Works
Here is a “while loop” set up to function exactly as the “for loop” functions:
int i = 0;
while( i < 10 ) {
    // do something)
    i = i + 1;
}
Notice that the declaration happens before the loop begins. We set up the variable, and give it the specified initial value. Then we test the counter to see if we need to process the loop body. If so, we enter the body and do whatever we are supposed to do. At the end of that processing, the loop counter is incremented, and we ask our question again.
See, all we really needed was a “while loop” and some rules on how to set things up.
Note
In that last example, the declaration of “i” would cause problems, since it is in a “scope” belonging to the rest of the code at that level. In the real “for loop” the variable would live “inside” those curly braces, and be hidden from the outside world.
For Silliness
Each of the control sections is optional. If you have nothing to set up before the loop, leave this part empty. (You do need the semicolon). If you do not want to indicate a condition to stop the loop, the assumption is that you want to keep on looping. You can eliminate this section as well. Finally, if you have nothing to do at the end of the loop body processing, leave this part off as well! What you are left with is this:
for(;;) {
}
This is the shortest loop you can build. It runs exactly as this one would:
while(true) {
}
I suspect we will be in these loops for a while. Effectively, we have halted further processing. Although there are valid reasons to want such loops, especially when they have a non-empty body to process, we will not dwell on these here.
Breaking out of a Loop
There may be times when you want to exit a loop before the loop normally terminates. The “break” statement will do that.
When the processor processes a “break” statement, it immediately finds the end of the nearest enclosing loop, and jumps to the statement after that point. You are completely out of the loop at that time, continuing on after that point.
You could set up an infinite loop using that empty “for loop” seen above, and bail out of it using a “break” statement when needed:
int i = 0;
for(;;) {       // we may be here a while!
    i++;
    if(i == 5) break;
}
Now it is not so “infinite” any more!
Continuing a Loop
If you have a complex loop, which tests several different things in turn. You may reach point where you know what to do for this pass, and do not need to test other possibilities. You can cause the loop to restart with the next value ignoring any other tests in your loop body. The “continue” statement jumps to the top of the loop and “continues” the loop body as though you reached the normal end of that loop body!
Here is an example.
int i = 0;
while( i< 10 ) {
    i++;
    if(( i % 2 ) == 0)
        continue;
    std::cout << i << " ";
}
std::cout << std::endl;
This will print out only the odd values. Why? You need to look up the “mod” operator (the “%” character in C++) if you do not know what it does. That one gives you the “remainder after integer division). Any number that is even will have no remainder when divided by 2, so the “continue” statement will be executed. We skip the output statement that comes next, and loop back. The output will be:
1 3 5 7 9
Nesting Loops
Since loops are structured forms, we are free to insert a loop inside a loop, to achieve a more complex process. We often do this when processing arrays of data stored in two dimensions (rows and columns):
for(int row = 0; row < max_rows; row++) {
    for(int col=0; col < max_cols; cols++) {
        data[rpw][col] = 0;
    }
}
We will study arrays later in the course.