CLion Graphics Setup
Mac Setup
In order to use CLion for graphics, we need a few additional components. For
Mac users, the compiler is part of the XCode package you must install from the
Apple App Store. Fortunately, at least for now, Apple includes all the
components we need to build our graphics projects. All we need to do is set up
a project, install a new CMakeLists.txt file as described below, and add
the two graphics files I provide. These notes will walk you through those
steps.
Windows Setup
Getting things running on the PC turned out to be a bit involved, but I finally figured out how to get things working.
We will need to install a package called freeglut. The file you need is
provided here:
Once this file is on your system, use the File Explorer program to
“Extract” the files in this .zip file. This file is a compressed file with
several folders in it.
You will find one major folder named freeglut inside this package, and
three other folders under that.
Use the Explorer program to move the entire freeglut folder and its
contents to the top of your C drive. You will end up with a folder named
C:\freeglut\ on your system
Note
You may be asked to the “Administrator” password to do this. Just use your normal logon password. (If this is not your machine, you may need to find the owner.
We need to copy one file from inside of the freeglut folder to another place
on your system.
32-bit Users
If your system is a 32-bit one (or you installed the 32-bit compiler) Your
compiler lives in the C:\Program Files (x86)\mingw-w64 folder. Locate the
following file:
C:\freeglut\bin\freeglut.dll
Copy that file into this folder:
C:\Windows\SysWOW64
64-bit Users
If you have a 64-bit system, and you installed the 64-bit compiler, your
compiler is located in the C:\Program Files\mingw-w64 folder. Locate this
file:
C:\freeglut\bin\x64\freeglut.dll
Copy that file into this folder:
C:\Windows\System32
Note
Windows has really strange naming conventions. We are placing a 64-bit library in a folder with a name that says 32 in it. If we are using 32-bit code we place the library file in a folder with 64 in it. That makes no sense, Microsoft!
Graphics Project Files
For all graphics projects using CLion we will need a few extra files.
Next, download these files and save them somewhere on your system, where you can find them later. (Not in a project folder). You will need them for lab projects.
CMakeLists.32-bit.txt(for 32-bit PC users)
CMakeLists.64-bit.txt(For 64-bit PC users)
CMakeLists.mac.txt(for Mac Users)
Warning
Once the correct CMakeList file is on your system, rename it to just
CMakeLists.txt. You only need one of the above three files.
Testing The Graphics Setup
Note
I am crossing my fingers that I got all of this working right!
Step 1: Create Your Project
Open up CLion as usual and set up a new C++11 project. Be sure to place the project in a sensible place and give it a sensible name. For these notes, I will use the project name “GraphicsDemo”
Once your project is set up, save it so all files are on the system in the
project folder you chose. Close the project for the following step (using
File -> CLose Project.
Step2: Add the Graphics Files
Copy these three files (which you downloaded earlier) into your project folder
so they are next to main.cpp. (You will be replacing the existing
CMakeLists.txt file with this new file).
Graphics.h
Graphics.cpp:
CMakeLists.txt
Note
The file must be named as shown.
Now, open up your project again.
You need to replace the code in main.cpp with the following code.
1 2 3 4 5 6 7 8 9 10 11 12 13 14 15 16 17 18 19 20 21 22 23 24 25 26 27 28 | #ifdef __APPLE__
#include <GLUT/glut.h>
#include <iostream>
#else
#include <GL/glut.h>
#endif
#include "Graphics.h"
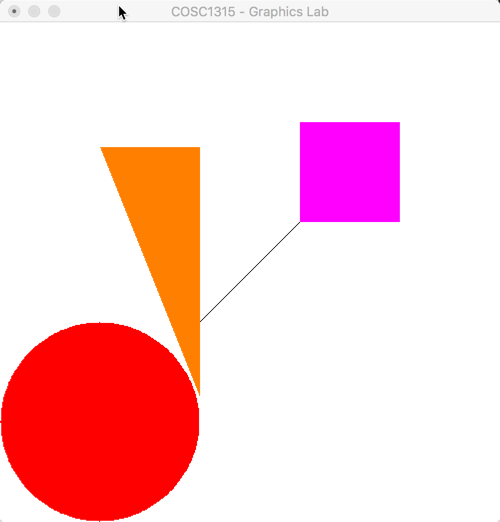
void drawScene(void) {
clearWindow();
setColor(YELLOW);
drawFilledTriangle(200,125,100,375,200,375);
setColor(BLACK);
drawLine(200,200,400,400);
setColor(RED);
drawFilledCircle(100,100,100);
setColor(MAGENTA);
drawFilledBox(300,300,400,400);
glEnd();
glutSwapBuffers();
}
int main(int argc, char ** argv) {
graphicsSetup(argc, argv);
glutDisplayFunc(drawScene);
glutMainLoop();
}
|
Step3: Test your Demo
Run your project as normal, and you should see graphics.
Warning
Apple really wants us to stop using Glut, so they are marking all calls to the Glut library as “deprecated”, which is a fancy term for “We don’t like this function”. CLion will mark these functions by adding a strike-through line through the name. Once I figure out how to suppress that, I will modify these notes. For now, this setup works well enough to complete the labs.
Note
If you have any problems with this, let me know as soon as you can. I will work with you to get things running properly. This is tough to do by remote control, but students in past classes have managed to get things working very nicely. I think you will enjoy the results!