Building a GLUI Control Panel
Read time: 16 minutes (4028 words)
We need a way to see our machine run. While we could hook things together and simply turn the machine on, that is not going to be a useful way to watch what is happening, and think our way through what is happening. In order to set up this machine to we can watch it run, we need to be able to control it at a very fine level, like one clock tick at a time. Actually, one control system step at a time would be better. What I want to do is build a control panel with buttons you can click that will tell the control unit to do one tiny step in the sequence of steps needed to complete an instruction. Ideally, we will have outputs showing on this control system where we can see that is going on. That means we need to display our data, as it moves along the wires.
We had enough power to do that in the graphics code I provided, but I found a tool that will make things easier to set up and much nicer looking.
GLUI
Originally developed at Oxford University back in 1999, GLUI is a lightweight GUI package that sits on top of GLUT (freeglut is what we are using). This package sets up a nice looking GUI, complete with several controls we can drive with our favorite pointing gadget - your Mouse!
The code is maintained on GitHub and is pretty easy to get running in your VM.
Ready. Here we go!
Add Dependencies
GLUI was available on my Mac using Homebrew, but on Linux, I needed to compile the code from source. To do that, I had to install a couple of other packages needed to build the code:
$ sudo apt-get install freeglut3-dev libxi-dev libxmu-dev
Those last two are needed to run graphics code on Linux using the X11 graphics system, which has been a part of Linux since the 1980s!
Clone GLUI
With the dependencies in place, we can clone the project:
$ cd cosc2325
$ git clone https://github.com/libglui/glui.git
$ cd glui
Building the project was simple:
$ make
See, Make is very common out there!
When the smoke cleared, there was a new file in the lib folder in this
project named libglui.a. We need that file and one include file in our
project folder.
New Project Folders
This new chunk of code is available as a “library” which is basically a bunch of object files wrapped up into a single file. Those object files are compiled for only one system, so it is important to make sure you do not try to use a library compiled for one system on another system.
I added the ability to build a project library file for our simulator to the
Makefile system we are using. However, the original setup did not deal with
libraries constructed for different systems. Since I routinely test on all
three major platforms, I needed to tweak the build system to handle this new
GLUI package, and be prepared to build libraries for any system. As a result, I
had to tweak two files in the mk folder. Here are the new versions:
1 2 3 4 5 6 7 8 9 10 11 12 13 14 15 16 17 18 19 20 21 22 23 24 25 26 27 28 29 30 31 32 33 34 35 36 37 38 39 40 41 42 43 44 45 46 47 48 49 50 51 | CXX := g++
TARGET := $(PROJNAME)$(EXT)
LIB := libavrsim.a
LIBDIR := bin
HDRS := $(shell python mk/pyfind.py include .h)
USRCS := $(wildcard src/*.cpp)
LSRCS := $(shell python mk/pyfind.py lib .cpp)
ALLSRCS := $(USRCS) $(LSRCS)
UOBJS := $(USRCS:.cpp=.o)
LOBJS := $(LSRCS:.cpp=.o)
DEPS := $(USRCS:.cpp=.d) $(LSRCS:.cpp=.d)
ifeq ($(PLATFORM), Windows)
DOBJS := $(subst /,\,$(UOBJS)) $(subst /,\,$(LOBJS))
else
DOBJS := $(UOBJS) $(LOBJS)
endif
CXXFLAGS := -std=c++11 -Iinclude -MMD
.PHONY: cpp-build
cpp-build: $(TARGET) ## build C++ application
$(TARGET): $(UOBJS) $(LIBDIR)/$(PLATFORM)/$(LIB)
@python $(MK)/pyversion.py inc-build
g++ -o $@ $^ $(LFLAGS)
%.o: %.cpp
$(CXX) -c -o $@ $< $(CXXFLAGS)
$(LIBDIR)/$(PLATFORM)/$(LIB): $(LOBJS)
ar rvs $@ $^
.PHONY: run
run: $(TARGET) ## launch primary build application
$(PREFIX)$(TARGET)
.PHONY: clean
clean: ## remove all build artifacts
$(RM) $(TARGET) $(DOBJS) $(DEPS)
.PHONY: realclean
realclean: ## delete the library file
$(RM) $(LIBDIR)/$(PLATFORM)/$(LIB)
-include $(DEPS)
|
1 2 3 4 5 6 7 8 9 10 11 12 13 14 15 16 | ifeq ($(PLATFORM), Mac)
CXXFLAGS += -I/usr/local/include
CXXFLAGS += -Wno-deprecated-declarations
LFLAGS += -framework OpenGL -framework GLUT
LFLAGS += -Lbin/Mac -lGLUT -lglui
endif
ifeq ($(PLATFORM), Windows)
CXXFLAGS += -I\tools\freeglut\include -Iinclude
LFLAGS += -L\tools\freeglut\lib\x64 -Lbin/PC
LFLAGS += -lfreeglut -lglui -lglu32 -lopengl32
LFLAGS += -Wl,--subsystem,windows
endif
ifeq ($(PLATFORM), Linux)
CXXFLAGS += -I/usr/include -Iinclude
LFLAGS += -Lbin/Linux -lGL -l GLU -lglut -lglui
endif
|
The only changes involve moving libraries into subfolders under bin, one
for each platform.
The Makefile system does not build these new subfolders. You can do that as follows:
$ mkdir bin/Linux
$ mkdir bin/Mac
$ mkdir bin/PC
(Not all are needed, unless you work on these platforms).
Assuming you already have the bin/Linux folder in your project, do this:
$ cp lib/libglui.a /cosc2325/lab2-CPUfactory/bin/Linux
$ cp include/GL/glui.h /cosc2325/lab2-CPUfactory/include
Note
If you build this system on anothe rplatform, be sure to compile the GLUI
library, and copy it into the correct subdirectory of bin. Currently,
this is working on Linux and Mac.
Now, here is a test file you can run to see if this all works. The code looks a bit strange if you have never worked with graphics projects, but it at least proves we have a way to build a nice front-end for our simulator:
1 2 3 4 5 6 7 8 9 10 11 12 13 14 15 16 17 18 19 20 21 22 23 24 25 26 27 28 29 30 31 32 33 34 35 36 37 38 39 40 41 42 43 44 45 46 47 48 49 50 51 52 53 54 55 56 57 58 59 60 61 62 63 64 65 66 67 68 69 70 71 72 73 74 75 76 77 78 79 80 81 82 83 84 85 86 87 88 89 90 91 92 93 94 95 96 97 98 99 100 101 102 103 104 105 106 107 108 109 110 111 112 113 114 115 116 117 118 119 120 121 122 123 124 125 126 127 128 129 130 131 132 133 134 135 136 137 138 139 140 141 142 143 144 145 146 147 148 149 150 151 152 153 154 155 156 157 158 159 160 | // Copyright 2019 Roie R. Black
#include <string.h>
#include <iostream>
#include "glui.h"
#ifdef __APPLE__
#include <GLUT/glut.h>
#else
#include <GL/glut.h>
#endif
#define PC_INCREMENT 200
#define PC_RESET 201
#define PC_ID 300
#define INS1_ID 301
#define INS2_ID 302
#define PCN_ID 303
#define ALUOP_ID 304
#define RD_ID 305
#define RS_ID 306
#define K_ID 307
#define A_ID 308
// "live" variables accessed by graphics routines
int last_x, last_y;
int main_window;
int _pc = 0;
int _counter = 0;
int _ins1 = 0;
int _ins2 = 0;
int _aluop = 0;
int _pcn = 0;
int _rd = 0;
int _rs = 0;
int _k = 0;
int _a = 0;
// This is the primary graphics object
GLUI *glui;
// control routine called when we click the mouse on a control
void control_cb(int control) {
if (control == PC_INCREMENT) {
_pc++;
} else if (control == PC_RESET) {
_pc = 0;
}
}
// user keyboard handler
void myGlutKeyboard(unsigned char Key, int x, int y) {
switch(Key) {
case 27:
case 'q':
exit(0);
break;
};
glutPostRedisplay();
}
// called when no other events need processing in the graphics loop
void myIdleFunction(void) {
if (glutGetWindow() != main_window)
glutSetWindow(main_window);
_counter++;
glui->sync_live(); // update display of "live variables"
glutPostRedisplay();
}
// User mouse handler
void myGlutMouse(int button, int button_state, int x, int y ) {
if ( button == GLUT_LEFT_BUTTON && button_state == GLUT_DOWN ) {
last_x = x;
last_y = y;
}
}
// draw the current screen - most work is behind the scenes
void myGlutDisplay() {
glClearColor( .9f, .9f, .9f, 1.0f );
glClear( GL_COLOR_BUFFER_BIT | GL_DEPTH_BUFFER_BIT );
glutSwapBuffers();
}
int main(int argc, char* argv[]) {
// basic graphics setup
glutInit(&argc, argv);
glutInitDisplayMode( GLUT_RGB | GLUT_DOUBLE | GLUT_DEPTH );
// create the top-level window and position it on the screen
glutInitWindowPosition( 50, 50 );
glutInitWindowSize( 300, 400 );
// create graphics window
main_window = glutCreateWindow( "AVRsim (v4.0.23)");
// register the user functions
glutDisplayFunc(myGlutDisplay);
glutKeyboardFunc( myGlutKeyboard );
glutMouseFunc( myGlutMouse );
// create GUI panel subwindow in the main window
glui = GLUI_Master.create_glui_subwindow(
main_window, GLUI_SUBWINDOW_TOP);
// add controls to subwindow
new GLUI_StaticText( glui, "Controls" );
new GLUI_Separator( glui );
GLUI_EditText *counter_edittext =
new GLUI_EditText(glui, "Count:", &_counter);
new GLUI_Button( glui, "Step", PC_INCREMENT, control_cb);
new GLUI_Button( glui, "Reset", PC_RESET, control_cb);
new GLUI_Button( glui, "Quit", 0,(GLUI_Update_CB)exit );
// set up machine display area
GLUI_Panel * machine = new GLUI_Panel(glui, "Machine");
GLUI_Panel * fetch_panel = new GLUI_Panel(machine, "Fetch");
new GLUI_EditText(fetch_panel, "PC",
GLUI_EDITTEXT_INT,
&_pc, PC_ID, control_cb);
new GLUI_EditText(fetch_panel, "Ins1",
GLUI_EDITTEXT_INT,
&_ins1, INS1_ID, control_cb);
new GLUI_EditText(fetch_panel, "Ins2",
GLUI_EDITTEXT_INT,
&_ins2, INS2_ID, control_cb);
GLUI_Panel * decode_panel = new GLUI_Panel(machine, "Decode");
new GLUI_EditText(decode_panel, "ALUop",
GLUI_EDITTEXT_INT,
&_aluop, ALUOP_ID, control_cb);
new GLUI_EditText(decode_panel, "PC+1",
GLUI_EDITTEXT_INT,
&_pcn, PCN_ID, control_cb);
new GLUI_EditText(decode_panel, "Rd",
GLUI_EDITTEXT_INT,
&_rd, RD_ID, control_cb);
new GLUI_EditText(decode_panel, "Rs",
GLUI_EDITTEXT_INT,
&_rs, RD_ID, control_cb);
new GLUI_EditText(decode_panel, "K",
GLUI_EDITTEXT_INT,
&_k, RD_ID, control_cb);
new GLUI_EditText(decode_panel, "A",
GLUI_EDITTEXT_INT,
&_a, RD_ID, control_cb);
new GLUI_Column(machine,true);
GLUI_Panel * execute_panel = new GLUI_Panel(machine, "Execute");
GLUI_Panel * store_panel = new GLUI_Panel(machine, "Store");
glui->set_main_gfx_window(main_window);
GLUI_Master.set_glutIdleFunc(myIdleFunction);
glutMainLoop();
return EXIT_SUCCESS;
}
|
We will remove the current main.cpp file and replace it with this code as a
start on our front-end code.
When you run this code, you should see this:
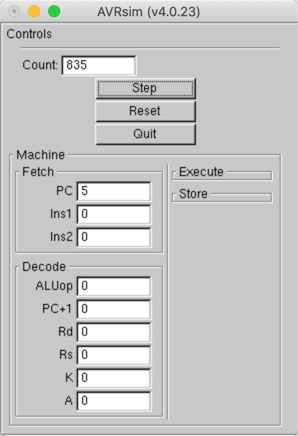
The counter is running showing the number of “frames displayed by the graphics
loop. This gives you a feel for how often we redraw the screen. The PC
window shows a program counter, which we start at zero. Clicking on the
Step button should increment the PC value, clicking on Reset should
return that PC to zero.
At the moment, nothing is hooked intot hsicontrol system, but that will happen soon. I will post notes showing how that is proceeding as I get things running.
Hey, this is a good start on building something we can use to watch our simulator work!
